-
Rreemo, did you use a clear coat? What did you learn about them? Should I worry about doing one? -
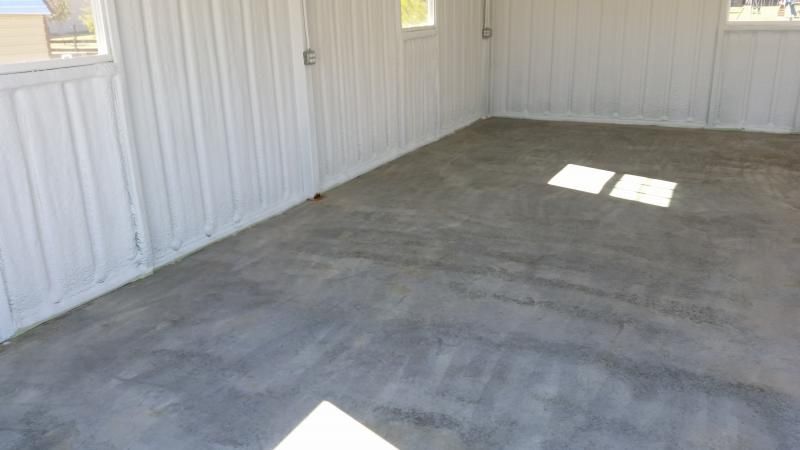
I thought I should come back and give an update on this deal. As I posted earlier, I ended up going with a commercial grade product that is sold by http://www.epoxyusa.com/. It's a fairly small operation, and the customer service alone made the whole deal worth it. I spoke with the owner over the phone for quite a while before I ordered the stuff and also called him back a couple times with some prep questions....he was readily available for me every time and really helpful throughout the process. I didn't end up going as extreme as using a full-on concrete grinder, but I did still end up doing quite a bit of prep work....here's how the process broke down:
- Since I was dealing with new concrete, I didn't have any stains or degreasing to address - so after a thorough sweep job, I went straight to the first round of acid etching - standard muriatic acid mixed 4:1 with water (25% acid mix), and sprayed on the floor with a (all plastic) 2-gallon pump-up garden sprayer.
2 things that I discovered here...(1) 4:1 wasn't strong enough for the acid mix, even though that is the mixture most often recommended to etch concrete, and (2) the garden sprayer didn't put out enough volume to do this job very well....may be adequate for smaller spaces (like a standard 2-car garage), but not for anything much larger.
- After a thorough rinse job I decided to do a second pass with the acid, this time I mixed it 2:1 into a 2-gallon plastic watering canteen....this worked WAY better....the acid mix was considerably stronger and I was able to get adequate volume on the floor....you want enough to saturate it so that it puddles up some. I did the shop in 2 -halves since it is 1500sqft.
I think I could have rinsed down and stopped here, but since I'd learned that overkill in the prep isn't a bad thing, I decided for an additional step (after another thorough rinsing with water)....
- I went to Home Depot and rented one of their circular floor buffers ($39/day)....

You can get these things with buffing pads, scotch-brite pads, and also heavier sanding style attachments that are typically intended to remove grout or glue when prepping interior floors....I chose one of those attachments, very similar to this (costs an additional $30 for the day)....

I went over the entire floor with this setup...the first pass was only slightly damp, and the second pass I did wet with plain water. It worked out really well because not only did it help to further roughen the surface, it also removed all of the loose slag that was leftover from when the concrete was originally poured.
The final step was to come back and thoroughly power wash the entire floor. After I let it dry a couple days it turned out exactly the way I wanted it...the floor was rough to the touch, about like 100-200 grit sandpaper.
Now it was time to add the epoxy...
This is a 2-part activated epoxy (1 gallon : 1 quart activator), and per the suppliers recommendation, you only want to mix it a little at a time...with 3 of us working, we found that 1-gallon at a time was about perfect, so the way it comes packaged is good. You of course will want to use a mixing attachment on a drill, and you only need to mix each batch for 8-10 minutes because time is money on this deal...once activated the clock starts ticking on cure time (too long mixing will actually make it harder to work with once it's laid out onto the floor).
There were 3 of us...1 working the mixing station, mixing the batches and dumping out in straight lines directly from the bucket to the floor...guy #2 using a squeegee to spread out the lines, and guy #3 working behind the squeegee with a 1/4" roller to smooth it out. With this sort of material you need to use a roller that is intended and specific for glues and epoxies. You also want to avoid over-rolling this stuff, because you will get too much air into the mix and cause it to bubble, and unfortunately air bubbles will not settle out of this type of material. It's okay if it looks a little uneven going down, this is a self-leveling epoxy, so it will level itself out as it cures. We actually worked from the front of the shop towards the back, and left a small area off to one side where we could work our way out the door as we got to the end of the job. I wanted to do it this way so that it would be laid on thicker out towards the front where there will be more floor traffic, especially where cars will be going in and out. Another good thing that we learned with this material is that it does not leave any lines or marks....you can actually do an area and stop, then come back later and just slightly overlap and continue on, and once it cures you won't see the line where you joined it....I assume this is likely another benefit of the self-leveling properties in the material.
I didn't take many pictures of the entire process, but here are some that show after it was prepped and dried, the floor partially done, and what it looked like a couple weeks later....
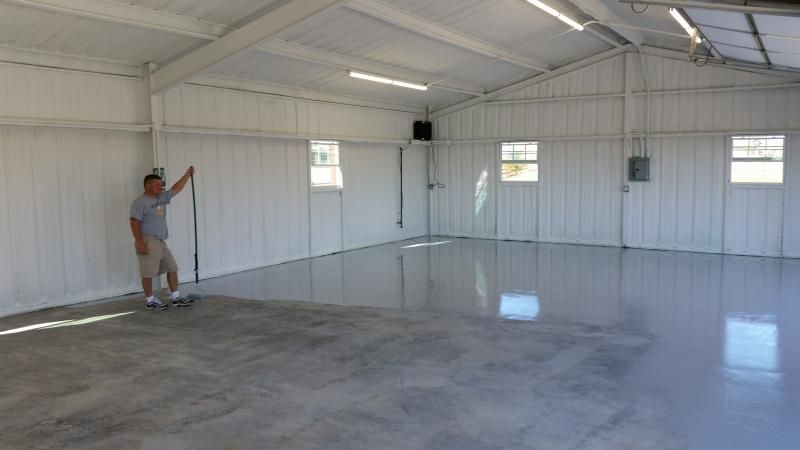
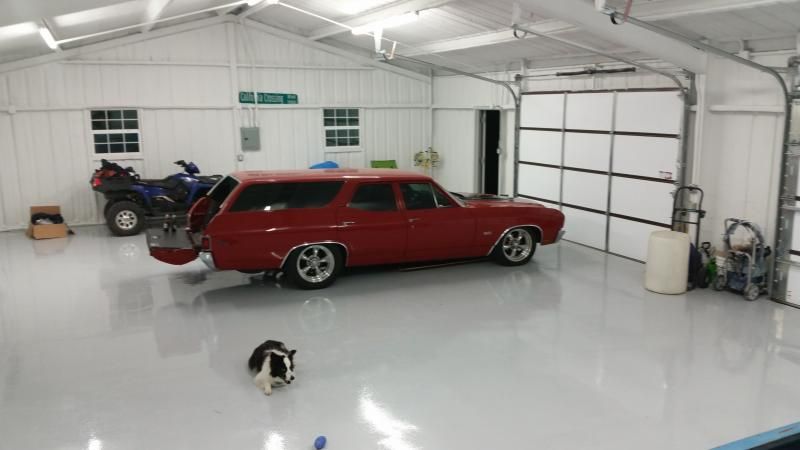

Overall I am very happy with the finished result. We applied it on a Saturday, and I was able to walk on it within about 10-12 hours, but I just cracked all the windows and closed the shop up until the following weekend before putting anything back in or parking any of the vehicles back in there. As you can see, it has a nice glossy finish to it...but what I'm also surprised about is how sticky the floor is even when its wet...it's not slippery at all like you'd think...to the contrary, it seems much more anti-slip than what I was expecting. I've been told this is another characteristic of a solids based epoxy vs. water-based.
Only time will tell how well it will hold-up, but so far it seems to be some tough stuff...I've slid some shelves and stuff around now that I'm starting to get more stuff moved in, and it doesn't mark the floor at all.
Total investment for the product and supplies was about $900 plus a couple cases of beer to keep the help happy. Last edited by Rreemo; 12-02-2014, 12:14 AM.
Leave a comment:
-
I used 2 gallons of H&C Shield-Crete from Sherwin Williams on mine and it's been going strong for 4 years now(wait until they offer 40% off). Only downfall is sometimes tire marks are shown. Wonder how it compares to the Armor Seal?

I also grinded out all cracks and filled cracks with Epoxy concrete patch in preparation.

Then acid washed the old concrete two times before installing the product.Last edited by stangin4lyfe; 11-25-2014, 10:07 AM.Leave a comment:
-
I have done three of my garages with Sherwin Williams (ArmorSeal?) epoxy product and had no issues. Going on 4 years on the last two I did and no sand blasting but did do a good surface clean and etch. Not cheap but is damn good productLeave a comment:
-
This reading is right about the sandblaster. Allowing it to rough the concrete up to make the epoxy bond real good to it. http://www.floorchips.com/helpfulhints.htmlLeave a comment:
-
Does anyone use the cheap quickcrete kits from Lowes any more. Mine has held up great for 8-9 years now. I degreased and acid washed several times before coating. The only places it chips are where my dumbass set up the washer boards in the garage a few months after coating. It didn't like having washers bounced off of it all night long.Leave a comment:
-
That's what the other guy told me too....he said the preferred method is to use a shot blast machine, apparently that's what all of the commercial grade pros use. But they aren't feasibly rentable.....like a $30K machine.Originally posted by 8mpg View Post
I'm going to try grinding it, we'll soon see.Leave a comment:
-
What happened to Grape on the board? Didnt him and his family own a company that does this? He always swore you had to sandblast the floor to get the stuff to stick properly.Leave a comment:
-
Man, that looks really good Danny! I had always thought about one of these type coatings in the house....I really wish I had done something like that back when I built mine, but I don't think this sort of stuff had taken off as much yet. You just can't beat the longevity how well this stuff holds up....and especially inside the house where you are just walking on it....well worth the investment.Originally posted by 46Tbird View Post
I had initially thought about hiring someone to do the shop, but man I'm just blowing the SHIT out of the budget. I was telling Christian just last night, I'm already about $15K over what I initially planned, and I'm not done yet.
I'm curious what you had to pay for something that nice (PM?)....most of the quotes I got were in the $3-$5 sqft range, and one "buddy deal" at $2.50, which doesn't seem bad at all. Looks like I'll save about ~$1500 overall doing it myself....and I've got some free help with my Dad and a couple buddies.
Leave a comment:
-
LOL. We had a few extra weeks before we moved, so we did all this before we ever moved our furniture in. Before they started, we taped off all vents and inlets, and left the HVAC system off. They had fans blowing everything out, and they spent a couple of hours with a vacuum and wet rags to wipe everything down. Concrete dust wasn't an issue.Originally posted by snacksnack View Post
Incoming PM!Originally posted by Doug Hatton View PostLeave a comment:
-
Danny, can you provide approximate cost? I need to have a 600 sq. foot garage done and maybe a 100sq ft patio.Leave a comment:


Leave a comment: